TI Codes: TI-84 Plus Technology
Engage students in short activities that build understanding of math concepts, programming logic and coding skills.
Unit 1: Program Basics and Displaying on Screen
Skill Builder 1 Using program editor and syntax
Download Teacher/Student DocsThis is the first of three ‘Skill Builders’ in Unit 1. At the end of this unit, you will use the skills you have learned in these Skill Builders to create a more complex program. This is your first lesson in learning to code with TI Basic.
TI Basic is a programming language that can be used to program on the TI calculators. While the structure and syntax (grammar) of TI Basic is simpler than other modern languages, it provides a great starting point for learning the basics of coding. Let’s get started.
Objectives:
- Use the TI Basic Program Editor to create and run a simple program.
- Use the program menus to select and paste commands into a program.
- Run a program.
Step 1
Turn on your TI-84 Plus CE and press the [PRGM] key.
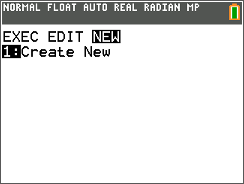
Select NEW using the arrow keys.
Select Create New by pressing [ENTER].
Step 2
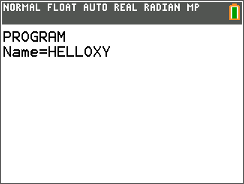
Name your program.
Our program name will be HELLOXY. It can be any legal name*. Press [ENTER] after typing the name. You are now in the Program Editor. Each line begins with the colon character ( : ).
*Legal Name: program names must: be up to 8 characters long, start with a letter, include only uppercase letters and numbers, with no spaces; and be unique.
This program will display a simple message on the home screen of your calculator.
Step 3
Selecting a programming command from the Program Menu.
The [PRGM] key now contains new menus that contain the commands that are used in TI Basic. If you want to use one of the commands, you must select it from this menu rather than type it on the screen.
Step 4
- Press the [PRGM] key.
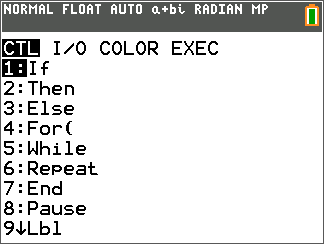
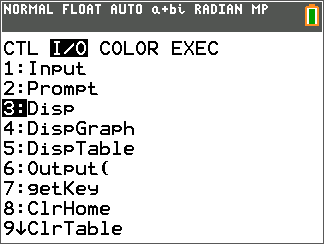
- Choose the I/O menu using the arrow keys. This menu contains all of the commands affecting Input and Output.
- Select Disp. The word will be pasted into your program at the current cursor position. The Disp command will display something on the HOME screen.
Step 5
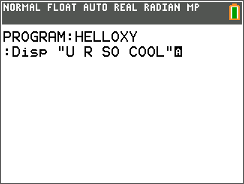
Type a greeting in double quotation marks.
This greeting is called a string, which is a group of characters that are “strung together”.
- Your string must start and end with quotation marks. Without the quotes, the program thinks you mean something completely different.
- Make your life easier: Press [2nd] [ALPHA] to turn on the alpha-lock while you type in the string.
Step 6
Your program is complete! Let’s run it now. There is no need to ‘save’ with TI Basic; the program is preserved as you type it in. That’s why we named the program first.
Step 7
To run the program:
Press [quit] ([2nd] [MODE]) to return to the HOME screen.
- Press [PRGM].
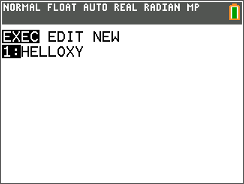
- Under the EXEC (‘execute’) menu, select your program.
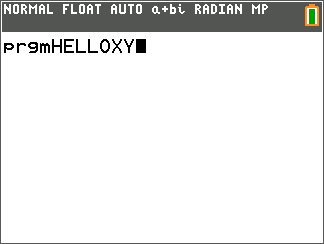
- Press [ENTER] to paste the program name on the HOME screen.
- Press [ENTER] again to begin the run.
Step 8
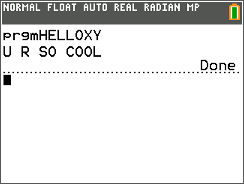
Your text message is displayed on the HOME screen.
You can edit your program, too:
- Press [PRGM].
- Choose the EDIT menu using the arrow keys.
- Select your program and press [ENTER].
Skill Builder 2 Editing programs; clearing the screen
Download Teacher/Student DocsIn this second of the three Skill Builders in Unit 1 you will practice editing a simple program and learn how to clear the HOME screen of your TI-84 Plus CE. We will use and add to the same program that you started in Skill Builder 1.
Objectives:
- Use the TI Basic Program Editor to add to and edit a simple program.
- Use the program menus to select and paste commands into a program.
- Use simple editing features to insert and delete things.
- Learn how to clear the HOME screen.
Step 1
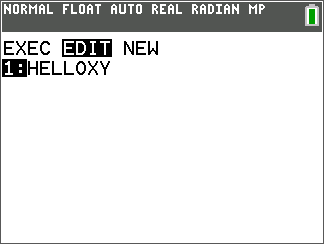
Turn on your TI-84 Plus CE and press the [PRGM] key. Select EDIT using the arrow keys.
Select the program you started earlier. We used HELLOXY in that lesson so our screen shows that program name.
Step 2
In the Program Editor the cursor is blinking at the beginning of the first statement in the program. Use the arrow keys to move the cursor.
We are going to edit this program and add more Disp statements to it.
Step 3
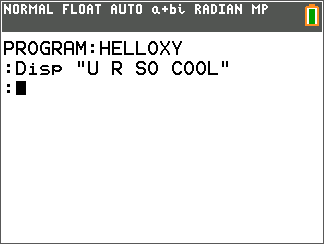
Move the cursor to the end of the first line of the program and press [ENTER]. A second colon will appear. This is the second line of the program.
- Press the [PRGM] key.
- Choose the I/O menu using the arrow keys. This menu contains all of the commands affecting Input and Output.
- Select Disp again. The word will again be pasted into your program at the current cursor position as shown in the figure to the right.
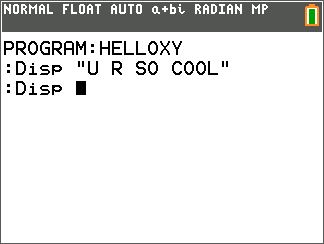
Step 4
Type another message in quotation marks.
Remember to press [2nd] [ALPHA] to turn on ‘alpha-lock’ while you type in the string. Note the change in the appearance of the cursor when alpha-lock is active.
Press [ENTER] again at the end of the second line and add more Disp statements.
You can add as many statements as you like, but it’s possible that you could add so many that the resulting text won’t fit on the screen all at once.
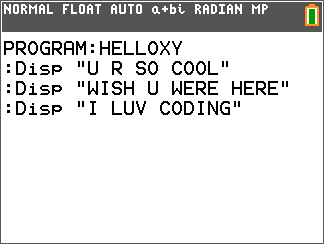
Step 5
Your program is complete. Let’s run it by pressing [quit] and selecting it from the EXEC menu of the [PRGM] key.
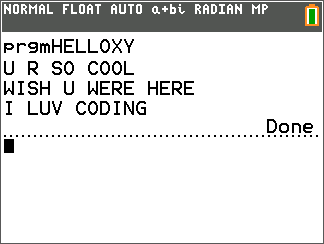
Step 6
Editing your program
To change the “U” in the second statement to “YOU”, use the arrow keys to place the cursor on the U, press [INS] ([2nd] [DEL]) so that you see a blinking underscore cursor. Type the Y and the O characters, then press an arrow key.
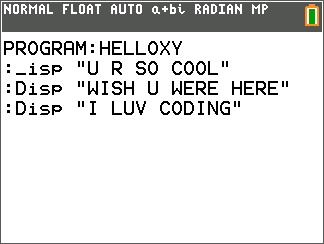
Step 7
To delete a character, press the [DEL] key on the character.
To clear an entire statement, press the [CLEAR] key anywhere in the statement. This clears the line of code and leaves a blank line (a colon with nothing after it). Blank lines have no effect on the running of the program; they are ignored. If you want to delete the blank line you can press [DEL] while the cursor is on the blank line.
When you are done (or if you just want to test what you have so far), press [quit] and run the program.
Step 8
Clearing the HOME screen
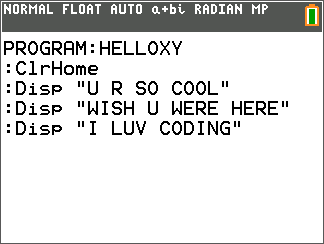
The ClrHome statement clears the HOME screen but we want this statement to be at the top of the program.
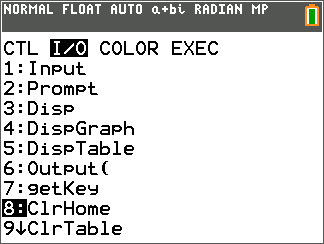
Step 9
- While editing your program place your cursor at the top of the program (on the “D” of the first Disp statement).
- Press [INS] and then press [ENTER] to make a new, blank line above the Disp statement.
- Press the up arrow key to place your cursor on that blank line.
- Press [PRGM] and use the right arrow key to see to the I/O menu and select the ClrHome statement.
Step 10
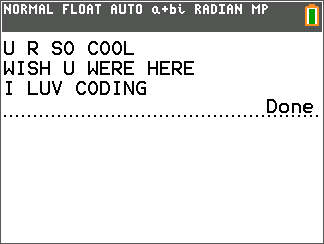
Quit the editor and run the program. You will see your text displayed on a clean HOME screen.
Skill Builder 3 Output to the HOME screen
Download Teacher/Student DocsIn this third of the three Skill Builders in Unit 1 you will practice editing a simple program and learn how to place text anywhere on the HOME screen using the Output statement.
Objectives:
- Use the TI Basic Output statement to control the position of text displayed on the HOME screen.
- Use the Pause statement to prevent a program from ending too soon.
Step 1
Turn on your TI-84 Plus CE and press the [PRGM] key. Select NEW using the arrow keys.
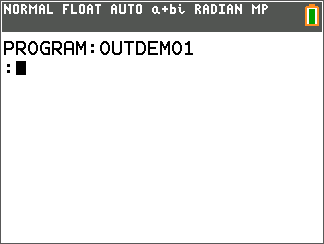
Press [ENTER] to create a new program and enter a name for the program. We will use OUTDEMO1 here. Note that to type the digit “1” we have to press [ALPHA] to turn alpha mode off.
Step 2
Using Output( Statements
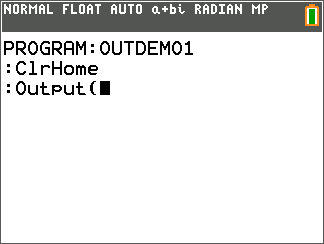
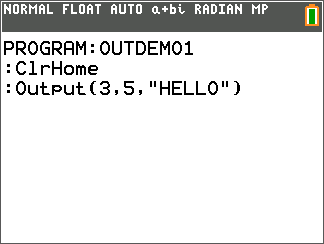
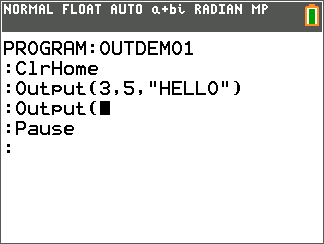
Start your program with the ClrHome statement from the [PRGM] key I/O menu. Remember to press [ENTER] at the end of the line.
Next, select the Output( statement from the same menu.
Step 3
The HOME screen is divided into an invisible grid of characters. The Output statement will place your text starting at one of these grid positions using the line number and column number of that position. The upper left corner is line 1, column 1.
So, after the open parenthesis in the Output statement, type 3,5,“HELLO”)
Remember to close the parentheses.
Step 4
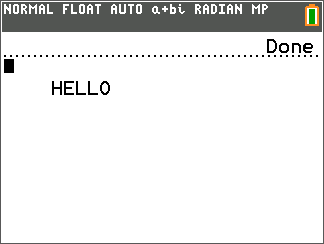
Let’s run the program. The result should look like the screen to the right if you used the same values.
Notice how ‘Done’ appears on the top line even though “HELLO” is displayed on the third line. The Output( statement has no effect on the current cursor position. The ClrHome statement positions the cursor in the top left of the screen, so the ‘Done’ is then displayed on the top line.
Step 5
Adding the Pause Statement
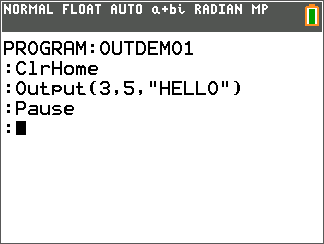
Edit your program and add the Pause statement below the Output( statement.
You will find Pause on the [PRGM] key CTL menu. CTL is short for ‘Control’ and the menu contains statements that control the behavior of the program.
Step 6
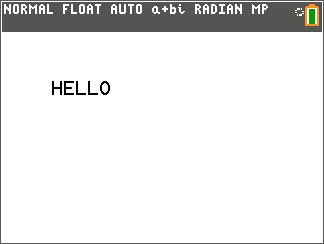
Run the program again and see what happens. See that the ‘Done’ is now missing?
Look closely in the top right of the screen and you’ll see the ‘busy’ indicator. That’s the Pause statement at work. The program is paused at this point and the user must press [ENTER] to continue. Then the ‘Done’ message appears at the top of the screen.
Step 7
Adding More Output( Statements to Your Program
Test to see what happens when there’s not enough room to display the message on the line.
Add a statement at the bottom of the program so that you end the program with a clear screen.
Application Create a title screen
Download Teacher/Student DocsIn this Application for Unit 1 you will make use of the statements learned in this unit to build one (or more) title screen(s).
Objectives:
- Use the TI Basic statements learned in Unit 1 to build a title screen for a larger program.
Step 1
Part 1:
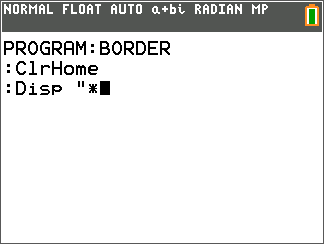
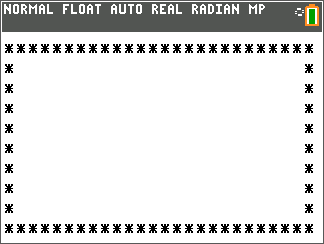
Use Disp statements to display a border of asterisks around the screen. Use an Output( statement to display the bottom line because Disp will scroll the whole screen. Remember to clear the HOME screen first and to pause the program at this point.
Step 2
With the empty border showing, when the user presses [ENTER], the text from Part 2 below will appear in the middle of the screen.
Note: TI-84 Plus users will have a different number of stars on the screen due to the different screen dimensions.
Step 3
Part 2:
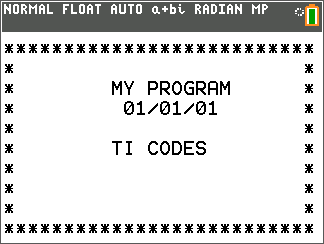
Use Output( statements to display a title, date, and author information centered in the border. The screen to the right is not very good because the text is not neatly centered.
After the text is displayed the user will need to press [ENTER] again to continue. At this point the program should clear the screen and then end.
- Skill Builder 1
- Skill Builder 2
- Skill Builder 3
- Application
Unit 2: Using Variables
Skill Builder 1 Prompting for a variable
Download Teacher/Student DocsIn the first lesson for Unit 2 you will learn about the Prompt statement to make your programs interactive, using variables to hold numeric values, evaluating and storing results of mathematical expressions, and using Disp and Output statements to show the results of stored computations.
Objectives:
- Use the TI Basic Prompt statement to assign a value to a variable.
- Know the difference between mathematical variables and computer variables.
- Perform calculations within Disp statements.
- Use Output statements to produce meaningful, readable results.
Step 1
Real Variables
- The TI-84 Plus has 27 built-in variables that are used to store numeric values.
- The values can be real (decimal) numbers or complex numbers.
- The variable names are the letters A through Z and the letter θ; (‘θ’).
.png?rev&la=en-AU&h=244&w=324&hash=56E53671938073F835EEF9DB24090650)
Step 2
- All variables contain a value. If a value is not assigned then the default value is 0 (zero).
- The values remain stored even when the calculator is turned off.
- If RAM is reset then all the values are set to 0.
The HOME screen at the right shows some variables (on the left) and their current values (on the right). Yours may differ.
.png?rev&la=en-AU&h=244&w=324&hash=56E53671938073F835EEF9DB24090650)
Step 3
The Prompt Statement
- The Prompt statement is followed by one or more variable names that ask the user to enter a value for a variable.
- It is called ‘Prompt’ because when you run the program, it displays the name of the variable and a question mark.
.png?rev&la=en-AU&h=244&w=324&hash=8961D60D537B9F7A4616C242A4098523)
Step 4
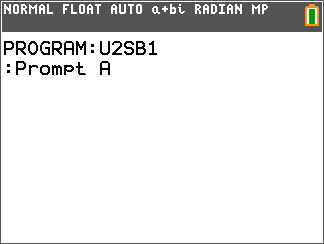
Programming with Prompt
- Start a new program.
- For first statement of the program use the Prompt statement found in the [PRGM] I/O menu.
- After the Prompt command type the name of the variable you want your program to use. In this program we will use the letter A.
Step 5
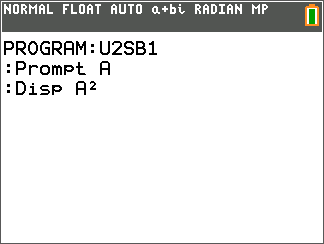
- Use the Disp statement to display the square A2 ; type A then the x2 key.
- Quit the editor and run the program.
- After the “A=?” prompt, type any number.
- The program displays the square of that number and ends.
Step 6
Entering Multiple Values with Prompt
- Edit the program from above.
- Add ,B to the Prompt statement.
- Change the Disp statement so that it displays the sum A+B
- Run the program again.
.png?rev&la=en-AU&h=244&w=324&hash=638BFBEC8A8963009393323D95704D46)
Step 7
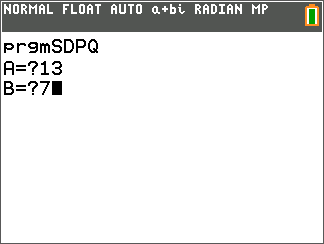
Notice the two prompts? The Prompt statement asks for a value for each variable separately.
This is a very simple, efficient program requiring only two statements, but these two statements are doing a lot of work!
.png?rev&la=en-AU&h=244&w=324&hash=081DA4E0A3980C18C0A7885811305B3A)
Step 8
Using Output( Instead of Disp
Recall that you can improve the output of programs using Output( rather than Disp to show the original values entered and the results properly labeled. Just put the calculation right in the Output statement. You try it.
Example: Output(5,7,A+B) show the value of A+B on line 5 beginning in column 7.
Step 9
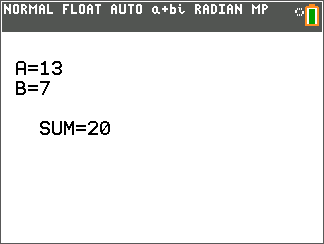
- In the previous step, you saw a screen of a running program showing the Prompt section. In this step you see a screenshot showing the Output section. Can you do better?
- Remember to include Pause and ClrHome statements at the right moments in the program to keep the screen neat.
You cannot output two items with one Output statement. The message “SUM=” and the sum A+B must be output using separate statements. Screen position is important!
Note: you’ll find the “=” (‘equals’ sign) in the Test menu [2nd] MATH.
Skill Builder 2 Inputting a value for a variable
Download Teacher/Student DocsIn this second lesson for Unit 2 you will learn about the different forms of the Input statement.
Objectives:
- Use the TI Basic Input statement to assign a value to a variable.
- Perform calculations within Disp statements.
- Use the GRAPH screen to get input to two variables at once.
Step 1
The Simple Input Statement
The Input statement is followed by only one variable name to ask the user to enter a value for that variable.
Unlike Prompt, Input only places a question mark on the screen as you can see in the program example at the right.
.png?rev&la=en-AU&h=244&w=324&hash=606BFBF2144A38917D05F57E99BF6C25)
Step 2
The Improved Input Statement
- The Input statement can display a custom message that is displayed before waiting for a value for the variable.
- The structure of the Input statement with a message is:
Input “YOUR MESSAGE HERE”,V
Note: This statement does not provide any question mark or other punctuation, so if you want one then it must be included inside the message.
.png?rev&la=en-AU&h=244&w=324&hash=00283D23BAF319E3B7FCC4C1EF328452)
Step 3
Programming with Simple Input
- Start a new program.
- For the first statement of the program use the Input statement found on the [PRGM] I/O menu.
- After the Input command type the name of the variable you want your program to use. Here we use the variable A.
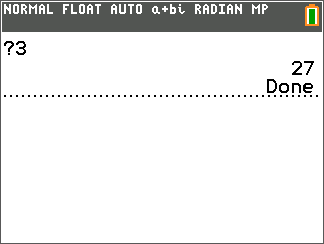
- Use the Disp statement to display the cube, A3 ; type the A then use the MATH menu to get the small ‘cubed’ exponent.
.png?rev&la=en-AU&h=244&w=324&hash=BBFA7B860F85040572F027BB243D58E3)
Step 4
- Quit the editor and run the program.
- After the “?” type any number and press [ENTER].
- The program displays the cube of the entered number and ends.
Step 5
Programming with Improved Input
- Edit the program you started earlier.
- Place the cursor on the variable after the word Input.
- Press [INS].
- Type a message to display. Remember to use [A-LOCK] and quotation marks.
- Include a punctuation mark at the end of the message (inside the quotes).
- Place a comma after the closing quote and before the variable.
.png?rev&la=en-AU&h=244&w=324&hash=D44A06841255FB5B1D1115C86F5FA859)
Step 6
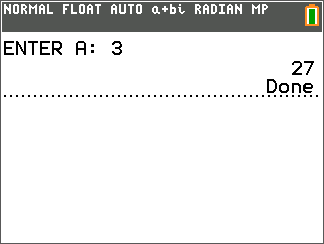
- Keep the Disp statement that displays A3.
- Quit the editor and run the program
- After the message type any number and press [ENTER].
- The program displays the cube of that number and ends.
Step 7
Using Input without a Variable
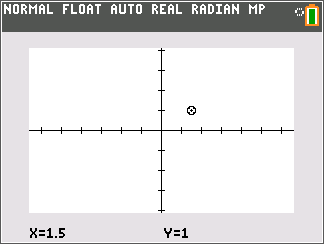
If you use the Input statement without a variable then the program will display the GRAPH screen with a free-floating cursor.
When you press [ENTER] the program continues and the variables X and Y contain the values that you pointed to on the GRAPH screen!
.png?rev&la=en-AU&h=244&w=324&hash=016757E2DE4CC0AC2D7A4A9FB95D19C3)
Step 8
You can then use these two variables in the rest of your program.
The intent of this feature is to let you input values for X and Y ‘graphically’. Cool, eh?
Skill Builder 3 Expressions and Storing
Download Teacher/Student DocsIn this third lesson for Unit 2 you will learn about using expressions and storing values in variables within programs.
Objectives:
- Learn about programming mathematical expressions.
- Understand order of operations.
- Realize the difference between mathematical variables and computer program variables.
- Evaluate expressions.
- Store the results of expressions in variables.
Step 1
Expressions
- Items such as A2 and A+B are called expressions.
- Mathematical formulas contain expressions:
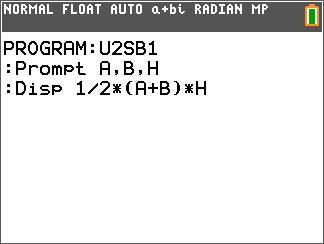
- The formula for the area of a triangle is A = 1/2 x B x H
- The expression is 1/2 x B x H
Step 2
- A program evaluates an expression using the current values of all variables and gives the result as a numeric value.
- Expressions are evaluated using the algebraic order of operations.
- Try the program to the right which computes the area of a trapezoid with bases A and B and height H.

Step 3
.png?rev&la=en-AU&h=244&w=324&hash=6566E07609DB5133EC64B6B0EB05B0A8)
Step 4
Mathematical Expressions and Computer Expressions
While there are many similarities in the appearance of expressions in mathematics and computer programs there are also important differences. The most significant difference is that in a mathematical expression the variables stand for ‘unknown’ numbers and are replaced with numbers when needed. In a computer expression the variables are names for numbers.
In mathematics we use formulas to state a relationship between things such as area and lengths. In programs we use the expressions to do the calculations and the variables’ values are used to compute a result. When we write the program we type the expression but when we run the program the expression is computed and creates a result to be used later.
Step 5
Storing Values in Variables: The Assignment Statement
- The STO➡ operator is used to store (assign) the result of an expression into a variable.
- Pressing the STO➡ key always displays the symbol ➡ .
.png?rev&la=en-AU&h=244&w=324&hash=984C530E60CE39A19A987365FD212450)
Step 6
- After pressing [ENTER], the HOME screen displays the result of the expression and the variable G now contains the value 5.
- In front of the arrow must be a value or an expression that produces a value. This is called the assignment statement because it assigns a value to a variable.
The symbol after the arrow must be a variable.
.png?rev&la=en-AU&h=244&w=324&hash=984C530E60CE39A19A987365FD212450)
Step 7
Programming with Assignment Statements
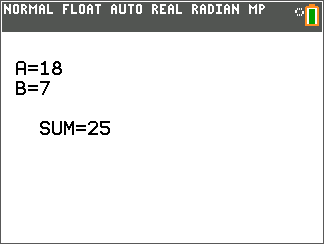
Let’s write a program that asks you to enter two numbers, stores their sum, difference, product, and quotient in four variables and then displays the results.
1. Start a new program. Our program name is SDPQ.
2. Prompt for two variables A and B.
3. Store the four expressions in four other variables S, D, P, and Q.
4. Display S, D, P, and Q.
Run the program.
.png?rev&la=en-AU&h=244&w=324&hash=F90782B8DBBA5F0BE9BA70B817DC5F6E)
Step 8
Enter a value for A and another value for B.
Be sure to use numbers for which you can confirm that the calculations were performed correctly! This is known as ‘testing’ the program.
.png?rev&la=en-AU&h=244&w=324&hash=C563ADC84C5F4C50FB42A35692CFEEC3)
Step 9
Making Improvements
You can improve the program using Output( rather than Disp to show the original values entered and the four results properly labeled. You try it!
To the right is a snippet of code and a screen of the partially completed program running. There’s still some work to do here so we’ll leave it to you to complete the program.
.png?rev&la=en-AU&h=244&w=324&hash=7809E60C75072124C54B1C6890B3CC4A)
Step 10
Remember to include a Pause statement at the end of the Output statements to prevent the ‘Done’ message from spoiling the display.
Remember that the TI-84 Plus and the TI-84 Plus CE have different HOME screen sizes (as well as different GRAPH screen sizes) so plan accordingly.
- TI-84 Plus HOME has 16 characters per line and 8 lines.
- TI-84 Plus CE HOME has 26 characters per line and 10 lines.
Application Computing a Formula
Download Teacher/Student DocsIn this Application for Unit 2 you will write programs to evaluate some mathematical formulas.
Objectives:
- Use the TI Basic statements learned in Unit 2 to write a program that evaluates a formula.
Step 1
The Pythagorean Theorem
In a right triangle with legs A and B and hypotenuse C,
A² + B² = C²
Write a program that asks the user to enter the lengths of the legs then computes the length of the hypotenuse and nicely displays all three values.
Note: You first have to solve the formula above for C.
.png?rev&la=en-AU&h=244&w=324&hash=5E097BCBFFB2304295C026EE0A6D803C)
Step 2
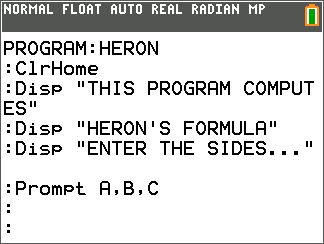
Heron’s Formula determines the area of any triangle using only the lengths of the three sides of the triangle, A, B, and C. It is usually stated in two parts:
 is the ‘semi-perimeter’ (half the perimeter) of the triangle
Step 3
 is the area of the triangle
Write a program that asks the user to enter the lengths of the three sides of a triangle and then computes the area and displays (Outputs) the sides and the area on a pretty screen.
Note: It’s possible for the user to enter three numbers that cannot be the sides of any triangle. What will happen when the user enters invalid values?

Step 4
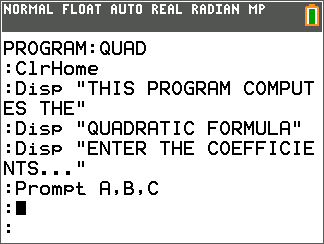
The Quadratic Formula
If a quadratic equation is of the form  then the roots of the equation are found by…
First, determining the discriminant:

And then the two roots are:

Step 5
Write a program that asks the user to enter the three coefficients of the quadratic equation, A, B, and C and nicely displays the coefficients and the two roots of the equation.
Note: You cannot use R1 and R2 as variables! Use something else.
What could possibly go wrong with this program?

- Skill Builder 1
- Skill Builder 2
- Skill Builder 3
- Application
Unit 3: Conditional Statements (If…)
Skill Builder 1 Using program editor and syntax
Download Teacher/Student DocsIn this first lesson for Unit 3 you will learn about conditions and the introduction to the If statements available in TI Basic
Objectives:
- Learn about conditions.
- Use the ‘simple’ If… statement to conditionally process another statement.
Step 1
If…Then statements are used to process a block of statements only when a condition is true or false. Before visiting the If…Then collection of statements, let’s get an idea of just what a condition is.
.png?rev&la=en-AU&h=244&w=324&hash=9CCDA3D8B49C735FD90E6A08A05D8F7D)
Step 2
Conditions and the [TEST] Menu
Conditions are expressions that evaluate to ‘true’ or ‘false’. Such expressions are either true or false; they cannot be both or neither. The relational operators and the logical operators are both found on the [TEST] menu ([2nd] [MATH]). The [TEST] menu contains the relational operators. The LOGIC menu contains the logical operators. The = sign is used to form a condition, not an assignment.
.png?rev&la=en-AU&h=244&w=324&hash=F3AE24430FF1D943CFBE4CFA67ACB257)
Step 3
Examples of some conditions:
| 3>5 | XY>0 | X=5 or Y=5 |
| X+4>X | B2-4AC=0 | X/2=int(X/2) |
| X≠Y | X>0 and Y>0 | not(X>0) |
.png?rev&la=en-AU&h=244&w=324&hash=F3AE24430FF1D943CFBE4CFA67ACB257)
Step 4
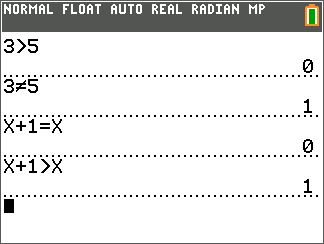
Conditions on the HOME Screen
You can enter conditions right on the HOME screen to see how they are computed.
Observe that 1 stands for true and 0 stands for false.
Note: when you use a variable in a condition the calculator evaluates it using the current value stored in the variable.
Step 5
Programming with the ‘Simple’ If… Statement
Try this program:
:Prompt A
:If A>0 [If is in the [PRGM] CTL menu. ‘>’ is in the TEST menu]
:Disp “A IS POSITIVE”
:Disp “A IS NOT POSITIVE”
.png?rev&la=en-AU&h=244&w=324&hash=5461F0F91A4251845520E8F51A065995)
Step 6
Run the program several times entering both positive and non-positive numbers and observe the output. What can you learn?
When the condition A>0 is true, the statement that follows If is executed, otherwise it is simply skipped. But the statement that displays “A IS NOT POSITIVE” is always executed, which is not correct! See the screen at the right. We’ll fix this soon.
This ‘simple’ If… is a concise way of skipping one statement based on a condition (when it is FALSE).
.png?rev&la=en-AU&h=244&w=324&hash=7B7356A72DD4294FA20F677191535503)
Step 7
Editing the If… Statement
Let’s correct the program above by adding another If…
- Place the cursor on the second Disp.
- Press [INS] and press [ENTER] to insert a blank line.
- On that blank line add If A<>
Quit and run the program several times using both positive and negative numbers and 0, too!
Does your program work correctly in all cases? If, not, try to fix the problem.
.png?rev&la=en-AU&h=244&w=324&hash=0B1391112640237D2F96627286E5A556)
Skill Builder 2 Editing programs; clearing the screen
Download Teacher/Student DocsIn this second lesson for Unit 3 you will learn about a better conditional structure and compound conditions.
Objectives:
- Examine the If...Then...End structure.
- Make compound conditions with the logical operators.
- Write a program using the If...Then...End structure that examines the regions of the coordinate plane.
Step 1
The If…Then…End structure
TI Basic has a unique If…Then structure that makes use of the End keyword to control the statements that form the block of code that will be processed when the condition is true. It looks like this:
If <condition>
Then
<true block: do these statements when the <condition> is true>
End
.png?rev&la=en-AU&h=244&w=324&hash=CF82339182F80C65A9A72086E884B2EB)
Step 2
Note:
If is followed by some <condition>.
Then is immediately below If, set on a line by itself.
There are one or more statements in the <true block>
End indicates the end of the Then block and the statements below End will be processed.
End is not the end of the program! It is the End of the If…Then…End structure.
.png?rev&la=en-AU&h=244&w=324&hash=CF82339182F80C65A9A72086E884B2EB)
Step 3
Compound Conditions
Compound conditions involve more than one relational expression. The logical operators and, or, xor and not( are found on the [TEST] LOGIC menu. These operators allow you to build compound conditions.
.png?rev&la=en-AU&h=244&w=324&hash=1AC6BA77F3948B8C04E9000AF16726D3)
Step 4
Examples:
- X>0 and Y>0 is true when both X and Y are positive
- X>0 or Y>0 is true when either X or Y is positive (or both)
- not(X>0 and Y>0) is true when either X or Y is not positive, it means the same as X<=0 or Y<=0
- X>0 xor Y>0 is true when either X or Y is positive but not both, it means the same as… X>0 or Y>0 and not(X>0 and Y>0)
.png?rev&la=en-AU&h=244&w=324&hash=F3AE24430FF1D943CFBE4CFA67ACB257)
Step 5
xor stands for ‘exclusive or’ and is true when either part is true but not both parts.
You cannot ‘string together’ the relational operators: 2<A<3 is interpreted to mean "A is between 2 and 3" and must be coded as 2<A and A<3. The logical operators have an order of operations just like the arithmetic operators +, - , *, and /.
A<0 or A<5 and A>2 means A can be negative or between 2 and 5.
and is processed before or (similar to ‘multiplication before addition’).
.png?rev&la=en-AU&h=244&w=324&hash=F3AE24430FF1D943CFBE4CFA67ACB257)
Step 6
Programming with If…Then…End Statements
Try the IFTHEN program to the right.
Note: Input has no variable. This is a special feature of TI-Basic. Recall from Unit 2 that the GRAPH screen will appear so that you can move the cursor anywhere and press [ENTER]to set values for X and Y.‘and’ is on the [TEST]LOGIC menu.
Then is on a line by itself right below If
End is the bottom of the ‘true’ block (the set of statements that are executed when the condition is true). It is not the end of the program.
.png?rev&la=en-AU&h=244&w=324&hash=6CF39C8ED08A3EC3EAAD7DA9A7BADADC)
Step 7
Complete the Program
A graph has several named regions: Quadrants I, II, III, and IV and the positive and negative x and y axes. Let’s write a program that allows the user to select a point on the GRAPH screen and then the program will tell where the point lies using those names.
.png?rev&la=en-AU&h=244&w=324&hash=28285B0A98749E911C2E2805BEF5AA36)
Step 8
We’ll start you off with a few If statements and you can finish the rest:
.png?rev&la=en-AU&h=244&w=324&hash=B45DDE1898E20F33E1254506652B98E6)
Step 9
Input (notice, no variable!)
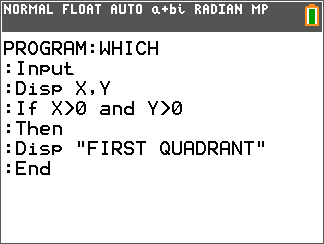
Disp X,Y
If X>0 and Y>0
Then
Disp "FIRST QUADRANT"
End
Step 10
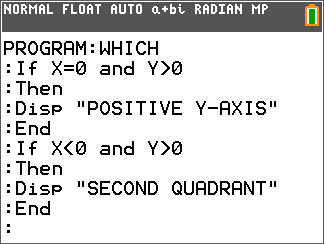
If X=0 and Y>0
Then
Disp "POSITIVE Y-AXIS"
End
If X<0 and Y>0
Then
Disp "SECOND QUADRANT"
End
....
When you have completed your program, you should have eight If structures (for the four quadrants and the four half-axes).
Skill Builder 3 Output to the HOME screen
Download Teacher/Student DocsIn this third lesson for Unit 3 you will learn about another form of the If statement in TI Basic and the value of understanding numeric algorithms.
Objectives:
- See the structure of the If…Then…Else…End statement.
- Learn the test for ‘whole-ness’ (is a value an integer?).
- What is an Algorithm?
Step 1
About If…Then…Else…End
In the previous activity you learned about the If…Then…End statement. There are times when we’ll need to take two different courses of action depending on a condition. The structure of this new If…Then…Else…End statement is similar:
If <condition>Then
<True block>Else
<False block>End
Step 2
Note:
Then, Else, and End are on line by themselves.
The <True block> is the set of statements that will be executed when the <condition> is true.
The <False block> is the set of statements that will be executed when the <condition> is not true.
Therefore, one or the other of these two blocks will be executed.
Step 3
Programming with If…Then…Else…End
We’ll write a program to tell whether or not an entered number is a perfect square. A ‘perfect square’ is the square of an integer, such as 25 (52). The method used here is to take the square root of the number and test to see if it is an integer. The program listing is at the right.
.png?rev&la=en-AU&h=244&w=324&hash=A18C01CD19460D67F508C500205FB6DE)
Step 4
Use the √ key on the keypad for the square root symbol.
If, Then, Else, and End are all on the [PRGM] CTL menu.
The int( ) function is on the MATH NUM menu. The function returns an integer, so, for example, int(6.56) = 6; int(9.999) = 9 int(-2.01) = -3
Try your own int( ) examples on the HOME screen. Remember to close parentheses for the int( ) function and the square root function. You’ll only use UPPERCASE letters in your Disp statements on the calculator. You can enter lowercase letters through TI-Connect CE.
.png?rev&la=en-AU&h=244&w=324&hash=EDCEA9C452545B48230CDC4B9FD90320)
Step 5
Algorithms
Techniques such as that used in this exercise are known as ‘algorithms’. An algorithm is a procedure or formula for solving a problem.
A recipe for baking a cake is an algorithm. If you follow the recipe you will have cake. All mathematical formulas, such as the formula of a triangle (A=B*H/2) are algorithms: they give you a method to determine a new value based on existing values. Algorithms such at the ‘perfect square’ technique above are important problem-solving tools. Learning common computer algorithms such as this will make your programming experience very rewarding.
Step 6
Here’s a box cake recipe…
- Prepare cake batter per directions on box.
- Bake as directed on package — two cake layers.
- Cool in pans 10 minutes.
- Remove from oven to wire racks.
- Let cool completely.
- Beat pudding mixes and milk with whisk 2 minutes.
- Immediately spread over tops of cakes.
- Stack cake layers.
- Frost with whipped cream and enjoy!
Application The Zodiac
Download Teacher/Student DocsIn this application for Unit 3 you will be developing a program that can tell the user in what sign of the zodiac an entered date lies.
Objectives:
Work with date conversions.
Use If statements to determine the sign of the zodiac for a given date.
Work with String variables.
Step 1
The Zodiac
In astronomy and astrology the zodiac is a division of the sky into 12 equal regions. The regions are named by the constellations that are approximately within these regions. The Babylonians developed this division around 1,000–500 B.C. They began their calendar year with the vernal equinox (the first day of Spring), hence the first sign of the zodiac is Aries and covers the period from March 21 to April 20.
Step 2
The Program
In this lesson we’ll write a program that lets a user enter a month and a day and then the program displays the sign of the zodiac for that date. This program utilizes many If…Then statements.
.png?rev&la=en-AU&h=184&w=244&hash=3599396BEB0C8186DAC7D7A8CEA4306A)
Step 3
The user will enter the month number and day number according to our calendar, and the program will convert the date into the Babylonian format (March = 1, April = 2, … , January = 11, February = 12). The tests for each sign can be complex.
For example:
If (M=1 and D>20) or (M=2 and D<>
To simplify the programming we’ll develop a single numeric value (a code) to represent the dates. This code makes it easier to write the If statements rather than have to deal with more complex expressions involving ands and ors.
Step 4
Pseudocode
When developing a large program it is often helpful to start with a plain-English outline of the program. This is called ‘pseudocode’ because it is not written using a specific programming language. The outline is written in a way that makes it easy to convert to a programming language later on.
Step 5
Here’s an outline (pseudocode) of the zodiac program:
PROGRAM: ZODIAC
Enter the Month user enters a number from 1 to 12
Enter the Day user enters a number from 1 to 31
Subtract 2 from the Month.
If the Month is less than 1 then add 12 to the Month.
The zodiac signs begin with Aries so we make March the first month and January and February are months 11 and 12.
Step 6
Create a one-number Code for the date (combine Month and Day into one number, the Code, whose first one or two digits are the month and whose last two digits are the day). We accomplish this by multiplying the month by 100 and add the day. For example: July 4 is Babylonian Month 5, Day 4 so the Code is 100*5+4 = 504
Multiply the Month by 100 and add the Day and then store the result in the Code variable.
Step 7
Store “Invalid” in a String* variable. This variable will be used later to display the sign or the word Invalid.
Now check to see in which zodiac sign the Code belongs:
if Code >=121 and Code<=220> (this represents the days from March 21 to April 20)
then
store “Aries” in the string variable
end
Write one of these structures for each of the twelve signs of the zodiac. After the 12 If structures the string variable will contain either “INVALID” or one of the signs, so… Display the string variable.
.png?rev&la=en-AU&h=195&w=260&hash=C3AF0B7B9178BCA3BE7E6C7D65662863)
Step 8
Here are the dates for each sign:
Aries: March 21–April 20
Taurus: April 21–May 21
Gemini: May 22–June 21
Cancer: June 22–;July 22
Leo: July 23–August 22
Virgo: August 23–September 23
Libra: September 24–October 23
Scorpio: October 24–November 22
Sagittarius: November 23–December 21
Capricorn: December 22–January 20
Aquarius: January 21–February 19
Pisces: February 20–March 20
Step 9
*Strings
This program stores a string of characters such as “INVALID” in a String variable. The TI-84 Plus CE has 10 string variables for you to use. To access these variable names press the v key and select the String… menu. Be sure to use only one string variable for all the signs of the zodiac.
.png?rev&la=en-AU&h=244&w=324&hash=C0FF5DC91A656DC5B465F43668EAEEE5)
Step 10
Your Task
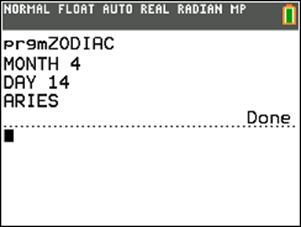
Write the program ZODIAC that meets the above specifications. The program should produce something like what is displayed here.
Caution: Pisces takes a special condition!
Step 11
Extension:
The program does not check to see if the month and day entered are legal dates. Add If statements after the input section to make sure that the values entered are ‘legal’.
Tip: Remember, some months have 30 days, some have 31, and one has only 29. Also, there is no month 13 or 14. See what happens if you enter 14 for the month.
- Skill Builder 1
- Skill Builder 2
- Skill Builder 3
- Application
Unit 4: Loops
Skill Builder 1 Loops and the For(…) loop
Download Teacher/Student DocsIn this first lesson for Unit 4 you will learn about the loop concept and the structure and use of the For(…) loop.
Objectives:
- Understand loops.
- Use the For(…) loop to generate a list of values.
Step 1
Loops
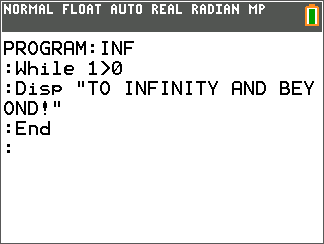
A loop is a method of repeating a set of statements. All programming languages have at least one looping structure. The loop structure has a way of going backwards in a program to a previous spot. TI-Basic has three different types of loops. An infinite loop never ends.
To ‘break’ (stop) a running program, press ON. You’ll see the options ‘Quit’ and ‘Goto’. ‘Quit’ returns you to the HOME screen and ‘Goto’ takes you into the Program Editor to the spot where the program stopped.
Step 2
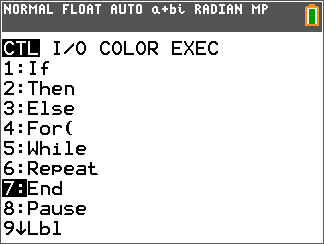
The Three TI-Basic Loops are:
For( ) … End
While <condition true> … EndRepeat <until condition is true> … End
The rest of this lesson deals only with the For( ) loop.
Step 3
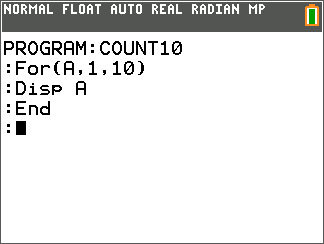
The For( … ) Loop
Structure: For(variable, starting value, ending value)
loop body
End
Example: For(A,1,10)
Disp A // loop body
End
Step 4
Note:
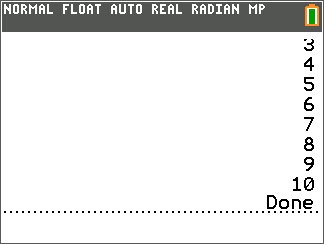
The For( ) statement requires a variable (the loop control variable), a starting value and an ending value, separated by commas. The starting and ending values can be variables. The loop body can be as many statements as needed but should not change the loop control variable. The loop will run from your starting value to your ending value with a standard increment of 1.
Step 5
For Loop With Increments Other Than 1
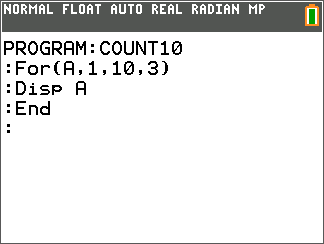
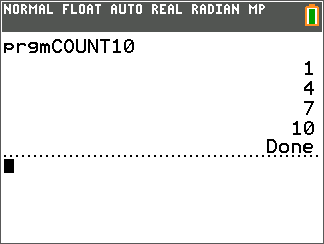
There is an optional fourth argument for the For( ) statement: the increment. The increment is the value by which the loop control variable increases with each iteration of the loop. The default value is 1.
Step 6
For(A,1,10,3) starts with A=1, then adds 3 to A each time the loop repeats. The loop stops when A is greater than 10. The increment can be a negative number.
For(B,10,0,-1) counts down from 10 to 0.
Step 7
Programming with For(…)
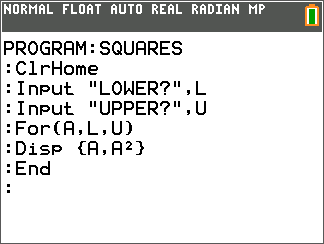
Let’s write a program that displays a table of numbers and their squares.
The user can enter the lower and upper bounds of the range of numbers.
The tricky part is to Display the pairs of numbers on the same line! We can do this using lists.
L and U are used to represent Lower and Upper. The For() statement uses the values of L and U. The list brackets are on the parentheses keys. Press [2nd] ( and [2nd] ) for the brackets.
Step 8
Run the program and enter a lower and an upper bound for the table.
If the lists go by too quickly then consider adding a Pause statement after the Disp statement and before the End statement.
Challenge:
Use an If … Then… End structure to Pause every 5 pairs of numbers. Recall the divisibility technique from the previous unit.
Skill Builder 2 The While…End loop
Download Teacher/Student DocsIn this second lesson for Unit 4 you will learn about the While…End loop. We’ll compare it to the For… loop and even show why it is more powerful and versatile than the For… loop.
Objectives:
- Learn the structure of the While…End loop.
- Compare it to the For…End loop.
- See how it is used to ensure valid input values.
Step 1
The While… End Loop
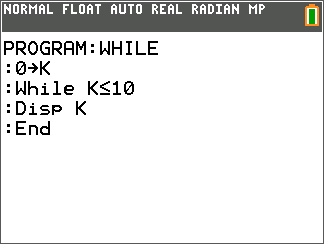
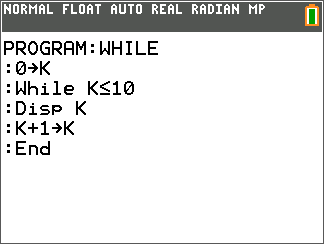
The While…End loop will continue looping as long as its <condition> is True. It looks like this:
While <condition>
<loop body>
End
Step 2
The <condition> is a logical expression such as X>0.
The <loop body> is any set of statements, including other loops and If structures. It is processed whenever the <condition> is True.
The keyword End is used to indicate the bottom of the <loop body>. At the End statement the program loops back to the While statement and tests the <condition> again.Step 3
Step 4
Step 5
Checking for Valid Input with While…End
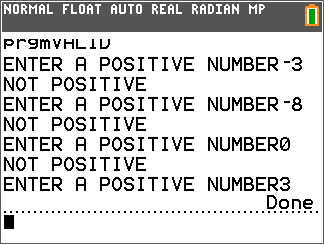
We’ll write a section of a program (a ‘code segment’) that makes sure that the user enters a positive number, tells her when that entry is invalid and to enter another value in its place.
The output of the code segment is shown to the right with some non-positive numbers entered to see the effect.
See if you can write this without peeking at the next page!
Note: TI-84 Plus users may have to use a shorter message as the screen is not as wide.
Step 6
Step 7
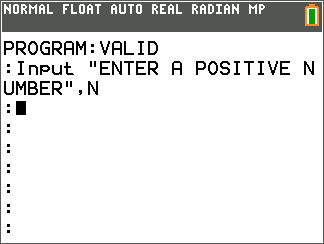
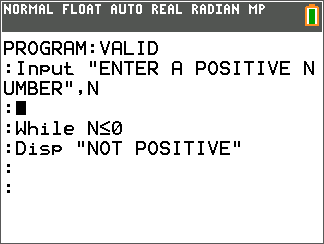
Then begin the While loop, checking to see if the value entered is negative. If it is then we’ll Display an error message.
The loop body will be entered only when N is negative, otherwise the entire loop body is skipped.
Step 8
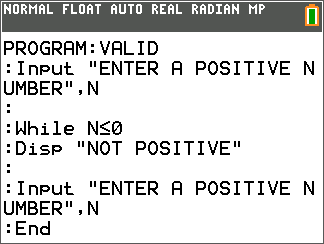
Finally, use the Input statement again at the bottom of the <loop body> to request another value from the user and then End the <loop body>
This code segment will ask for a value from the user and make sure that the entry is a positive number. Below this code segment will be more statements to process the number entered.
Skill Builder 3 The Repeat…End loop
Download Teacher/Student DocsIn this third lesson for Unit 4 you will learn about the Repeat…End loop. We’ll compare it to the For… loop and even show why it is more powerful.
Objectives:
- Learn the structure and logic of the Repeat…End loop.
- Compare it to the While…End loop.
- See how Repeat…End is used in programming the Fibonacci sequence.
Step 1
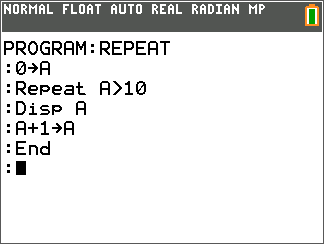
The Repeat… End Loop
The Repeat…End loop will continue looping as long as its <condition> is False. This is the exact opposite if the While loop behavior and that’s not the only difference! It looks like this, which looks pretty much the same as the While structure:
Repeat <condition>
<loop body>
End
The programs on the right have the same output. What are the differences?
Step 2
The <condition> is a logical expression such as X>0.
The <loop body> is any set of statements, including other loops and If structures. It is processed once and then continues until the <condition> is true so it behaves more like this:
Repeat
<loop body>
until <condition> is true End
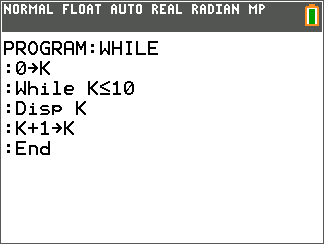
Step 3
But there’s no ‘until’ keyword in TI Basic. It’s implied. Even if the <condition> is true to start with, the loop body is still processed once because the condition is tested at the bottom of the loop.
In a While loop it’s a great idea to ‘initialize’ the variable(s) that your loop relies upon. In a Repeat loop this will happen inside the loop body so initializing is not necessary.
As with While, somewhere in the <loop body> there should be a statement that will have an effect on the <condition> so that the loop will eventually end and statements after the loop can be processed. Usually this statement is near the bottom of the <loop body>.
Step 4
Programming the Fibonacci Sequence
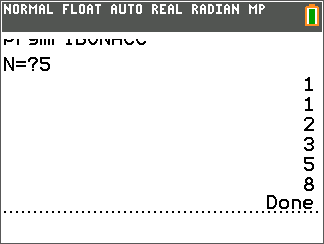
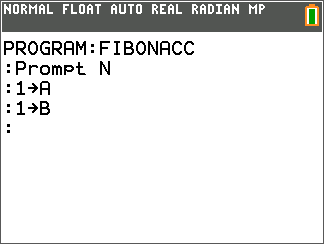
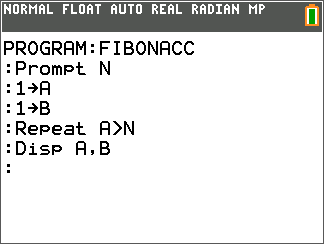
Let’s write a program that displays the Fibonacci sequence up to a certain value. You can research the Fibonacci sequence if you’ve never heard of it.
The output of the program is shown to the right. Can you write this program without peeking below?
Step 5
Step 6
Step 7
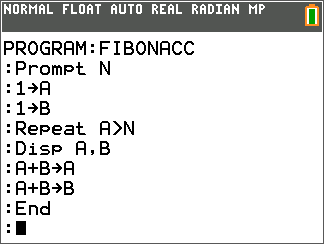
Finally, we calculate the next two Fibonacci numbers and End the loop.
These last two loop statements show that A+B is being stored in both A and B and it appears that A and B are getting the same value. This is not the case! Try it with 1 and 1. The first statement stores 1+1 in A, making A 2. The second statement stores 2+1 in B making it 3. Try it yourself - ‘play computer’!
Step 8
Run the program with several different input values. Does it behave as planned?
Try changing the Repeat condition to B>N. What is the effect? How can we modify the program to display the ‘correct’ set of numbers, stopping when exactly the largest Fibonacci number less than N has been displayed?
Application Warning Notices
Download Teacher/Student DocsThis Application (WARNING NOTICES) makes use of loops to enter as many values as needed and, as an extension, checks for valid values entered and uses If statements to display an appropriate message.
Objectives:
- Learn about Counter and Accumulator statements.
- Use a loop in a program to get an undetermined amount of data.
- Use a ‘flag’ value to terminate a loop.
Step 1
Nested Structures
- Nesting is the programming technique of placing one control statement inside another. The term is derived from the idea of placing one cardboard box inside another in order to save space.
- It’s important to put one complete structure completely inside a block of another in order to avoid errors.
Step 2
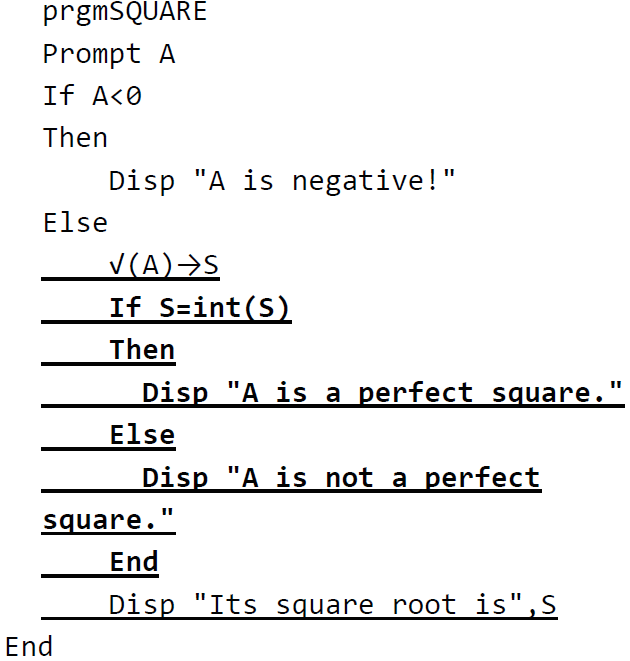
- The program listing at the right shows an If structure inside the Else block of another If structure. Notice the multiple uses of the End statement; the computer knows which End belongs with which If.
- The indenting is for instructional purposes only. You cannot indent lines in TI-Basic.
- The program first tests to see if A<>. If it is, the program displays “A is negative!” and nothing else. But when A is not negative then the underlined square root calculation, another If statement, and the Disp statement are all executed.
- The programmer places Ifs inside loops and loops inside Ifs to accomplish more complex tasks as the program requires.
Step 3
Summary of the three loops:
For(var, start, end) While condition is true Repeat until condition is true
End End End
For( is used when ‘counting’ or processing an arithmetic sequence of values (iteration).
While is used when you might be able to skip the loop body completely.
Repeat is used when you are certain that you want the loop body to run at least once.
Step 4
About End
The keyword End is used for all the multi-line control structures:
| If … | If … | For( … ) | While … | Repeat … |
| Then | Then | End | End | End |
| End | Else | |||
| End |
Step 5
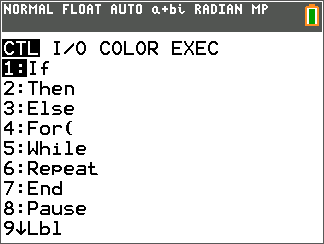
And this is why the CTL menu is arranged the way it is: 7: End comes after the first six CTL menu items because it ‘ends’ each of those programming control structures.
End statements can appear many times in a program, and the computer knows how the Ends are connected to their control structures.
Step 6
Unit 4 Application: Program “Warning Notices”
Most schools send out regular progress reports based on a student’s current average. An average of 60% or higher is considered passing, but if the average is below 70% then the student is considered ‘in danger’ or ‘marginal’.
Let’s write a program that lets the user enter some test grades, determines the average, then Outputs the number of grades entered, the average of the grades, and an appropriate warning message to the user. The warning messages can be: “Passing”, “Marginal”, and “Failing”.
Step 7
We can use two methods to enter an unknown number of grades:
- Method 1: ask for the total number of grades first and use a For loop to enter the scores.
- Method 2: ask for scores but use a ‘flag’ value such as -999 to indicate that there are no more grades. This method will use a While loop or a Repeat loop.
In both methods we will have to keep a running total of the grades. In Method 2 we also have to count the grades so that we can divide the total by that count.,
Step 8
Your program should display the number of grades entered, the average of the grades and the appropriate warning message:
If the average is below 60: “Failing”
… 60 to 70: “Marginal”
… above 70: “Passing”
Step 9
Counters and Accumulators
A statement such as C+1➔C is called a counter because it adds 1 to the variable C each time it is executed.
A statement such as T+N➔T is called an accumulator because it keeps a running total of the values of the variable N. The value of N is added to the variable T and then that sum is stored back into the variable T. At the end of a loop T will contain the total of the N values. Here’s an example that uses a Counter and an Accumulator and a ‘flag’ value to keep track of the G’s in a program:
Step 10
| Example: | Notes: |
| 0→C | C is for Count |
| 0→G | G is for Grade |
| 0→T | T is for Total |
| Prompt G | get first Grade |
| While G≠-999 | as long as it is not -999 |
| C+1→C | add 1 to the Count |
| T+G→T | add the Grade to the Total |
| Prompt G | ask for another Grade |
| End | |
| Disp "Total =",T | |
| Disp "Count =",C |
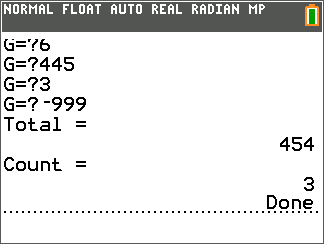
Step 11
The While loop above continues counting and accumulating the G’s as long as -999 is not entered. When -999 is entered the loop stops and the results are displayed.
Extension
As part of your input routine check to make sure that the value entered is a legitimate grade (between 0 and 100) and take appropriate action when the entered value is not legitimate.
- Skill Builder 1
- Skill Builder 2
- Skill Builder 3
- Application
Unit 5: Graphics
Skill Builder 1 Drawing
Download Teacher/Student DocsIn this first lesson for Unit 5 you will learn about some of Drawing commands that draw shapes on the Graph screen.
Objectives:
- Use the [draw] menu to get a drawing command.
- Learn the syntax of some of the drawing commands.
- Learn the difference between commands that use point coordinates and pixel coordinates.
Step 1
The [DRAW] Menu
- From the HOME screen press [DRAW] ([2nd] [PRGM])
- Select Line(
- Complete the command with 0,0,3,4) so that the complete command states:
Line(0,0,3,4)
- Press [ENTER] to see a line drawn from the origin to the point (3, 4) on the GRAPH screen.
Most drawing commands such as Line, Circle, and Pt-On use the WINDOW coordinates as the frame of reference.
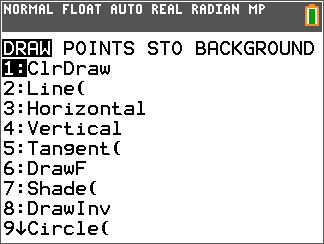
Step 2
Drawing in Programs
There are many TI-Basic programming tools that affect the appearance of the GRAPH screen. Here we examine a few of them:
- ClrDraw to clear any drawn objects [DRAW]
- FnOff to turn functions off VARS YVARS On/Off
- PlotsOff to turn stat plots off
Use the [DRAW] menu to select an object to draw. See the example to the right.
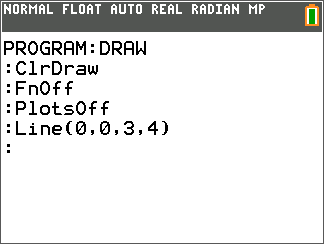
Step 3
Color Options (TI-84 Plus CE and TI-84 Plus C Silver Edition only)
The Line( command has an optional fifth argument which determines the color to be used. To select a color press [PRGM] COLOR or VARS COLOR and select your color. The name of the color is inserted into your program but simply represents a number (BLUE=10, RED=11, BLACK=12, etc.). See the example to the right. Many drawing commands have a color option. On the TI-84 Plus the fourth argument can be a 1 or a 0: 1 to draw the line in black, 0 to draw it in white.
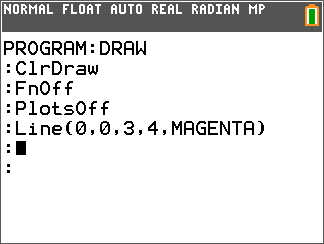
Step 4
Help!
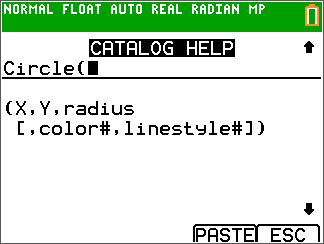
Help with any command in the calculator is available by pressing the + key while highlighting the command on any menu. To the right is the help screen for the Circle( command. It shows the number and order of the entries. X,Y are the coordinates of the ¢er of the circle, then the radius. The [optional] entries are the color name or number and the line style (1 to 4). You can complete the command right on this screen and then press the TRACE key to ‘PASTE’ the command into your program.
Step 5
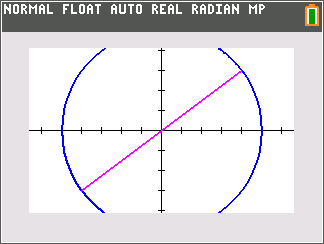
Can you draw this?
Can you duplicate the drawing at the right in a program?
Hint 1: it’s only two commands but the window and the numbers are important!
Hint 2: (X, Y) is the center of the circle and radius is the distance from the center to the circle. (color# and linestyle# are optional)
Tip: you can set the GRAPH window in a program. While editing a program press ZOOM and choose a setting or assign values for each window edge by assigning values to the variables found on VARS Window… such as: -20➔Xmin
Step 6
Circle Art
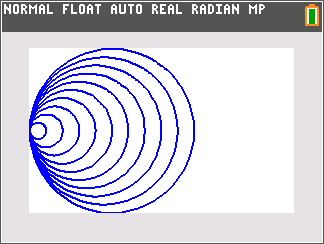
Complete the Circle statement in the program below to produce the picture to the right.
PROGRAM: Circles
:FnOff
:PlotsOff
:ClrDraw
:ZStandard
:ZSquare
:For(I,1,10)
:Circle( , , )
End
Step 7
Note: ZStandard and ZSquare are found on the ZOOM menu.
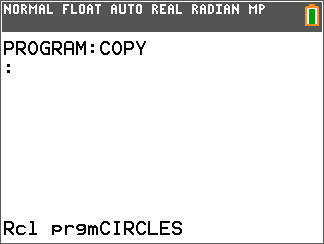
Copying one program to another:
- Start a new program.
- In the Editor press RCL ([2nd] Sto➔).
- Press [PRGM] and arrow to EXEC.
- Select the program you want to copy. See the screen to the right where we are in the process of copying [PRGM]CIRCLES into [PRGM]COPY.
Press [ENTER] to paste the code into the new program.
Skill Builder 2 Points and Pixels
Download Teacher/Student DocsIn this second lesson for Unit 5 you will learn about plotting points and the difference between the Pt-On and Pxl-On commands.
Objectives:
- Use the point and pixel plotting statements.
- Develop formulas to utilize graphics in programs.
Step 1
Point Command
See the [DRAW] POINTS menu.
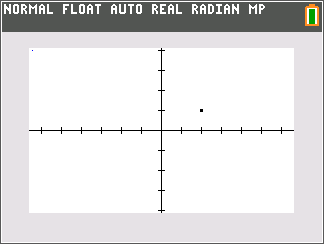
Pt-On(x,y) plots a point according to the graph WINDOW settings. It means ‘turn the point on’. Pt-On(2,1) plots the point in the first quadrant in the screen to the right. Pt-On(x,y,style,color) has optional arguments: style (1 to 4) and color. See the syntax help by pressing + while on the command in the [DRAW] menu.
Pt-On(100,100) will plot a point even if it’s out of the current viewing window.
Step 2
Pixel Command
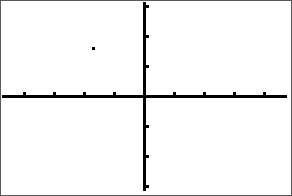
Pxl-On( uses the screen’s pixels and ignores the WINDOW settings. Pxl-On(2,3) plots the tiny pixel in the upper left corner of the same screen at row 2, column 3. It is hard to see! The coordinates are not in the usual (x,y) order: they’re ‘backwards’ because they refer to (row#, column#). Pxl-On(x,y,color) has only an optional color argument. There are also corresponding –Off(, –Change(, and -Test commands that we’ll not deal with here.

Step 3
Pixels
Depending on your TI 84 Plus family calculator, your screen has a set number of pixel columns and rows: TI-84 Plus: 96 columns x 64 rows and TI-84 Plus C/CE: 265 columns x 165 rows. Rows are horizontal (across) and columns are vertical (up and down). Split screen settings affect the number of rows and/or columns depending on the setting.
Step 4

Step 5
Programming with Points
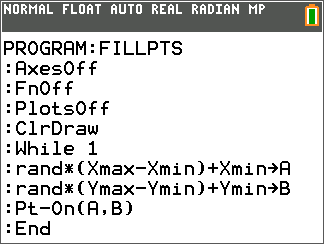
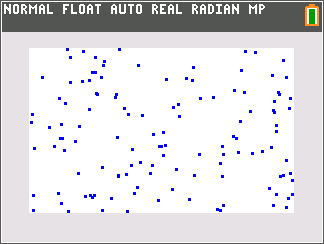
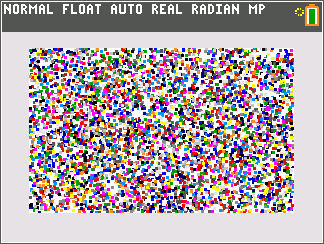
Let’s write a program that randomly fills the GRAPH screen with POINTS. This program will have an infinite loop so press ON to ‘break’ out of the program.
We’ll need an algorithm (formula) to get a random point on the current GRAPH screen within the window ranges:
Step 6
rand is found on the MATH PROB menu and generates a random number between 0 and 1. rand*(Xmax-Xmin) generates a random number between 0 and Xmax-Xmin so we’ll add Xmin.
rand*(Xmax-Xmin)+Xmin generates a random number between Xmin and Xmax. …and we write a similar formula for the Y-coordinate.
And this is why mathematics is so important to programming!

Step 7
Note:
AxesOff is on the [FORMAT] screen.
FnOff is on the [VARS] Y-VARS On/Off… menu.
PlotsOff is on the [STAT PLOT] menu.
ClDraw is on the [DRAW] menu.
Step 8
While 1 creates an infinite loop since True is represented as 1 in the calculator.
The random values are stored in A and B for plotting.
Remember to press [ON] to ‘break’ the program.
This program works the same on any TI-84 Plus Family device!

Step 9
Enhancing [PRGM]FILLPTS with Color
On the TI-84 C/CE you can add random COLOR to the Pt-On( statement. The lowest color number is 10 and the highest is 24.
Write a statement that generates a random integer from 10 to 24 using randInt( ) and add that as the third argument to the Pt-On( statement.
Step 10
Add the following statement before Pt-On(A,B). Change Pt-On(A,B) to Pt-On(A,B,C).
<your color generator> ➔ C
Note: There are two optional arguments to Pt-On: style and color. Style can be from 1 to 4 and color can be from 10 to 24. So if the third argument is a value from 1 to 9 then it’s a style. If it’s between 10 and 24 it’s a color. Other values cause an error.

Skill Builder 3 Lines, Text and Colors
Download Teacher/Student DocsIn this third lesson for Unit 5 you will learn about drawing lines, text and color enhancements.
Objectives:
- Use the line, function, and text drawing statements.
- Use colors in graphics statements.
- Develop formulas to utilize graphics in programs.
Step 1
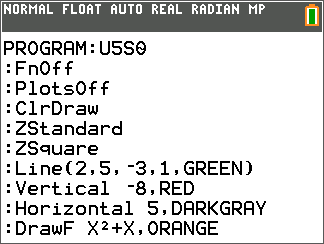
Drawing Lines and Curves
Line(X,Y,W,Z) draws a segment between points (X,Y) and (W,Z). See CATALOG HELP for the optional features.
Vertical A draws the vertical line X=A.
Horizontal B draws the horizontal line Y=B.
DrawF X2+X draws the function. This is different than graphing the function.
See the examples to the right. Note the optional colors found on the [PRGM] COLOR menu. Color is not available on the TI-84 Plus.
Step 2
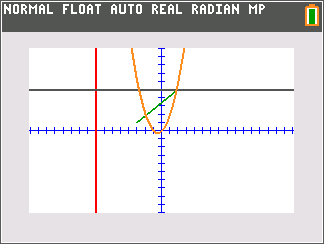
Tip: to draw part of a function divide the function by the interval desired:

draws the blue curve seen here (Why?):

Step 3
Text Drawing
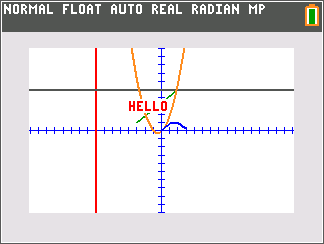
The Text( drawing statement is unique because it uses pixel values rather than window (point) values for positioning the text. There is also a separate TextColor( statement that sets the color of the next text drawn.
Text(50,100,”HELLO”) displays HELLO in the same spot on the screen regardless of the WINDOW settings. Row 50, column 100 of the pixels represents the upper left corner of the text to be drawn.
Note: Remember your screen’s pixel dimensions: TI-84 Plus: 96 columns x 64 rows and TI-84 Plus C/CE: 265 columns x 165 rows.
Step 4
Programming with Line( and Algebra
This programming activity ‘enhances’ the Line( statement.
The Line( statement only draws a segment between two points. We’d like to see a line through the two points and extend all the way across the screen regardless of which two points are selected. This activity makes use of Algebra concepts, so be prepared!
Step 5
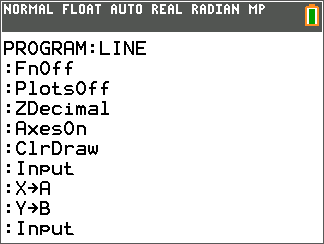
- Start a new program. We will call it LINE.
- Add the usual graph setup statements to the beginning of the program.
- Use two Input statements without variables to get the coordinates of two points on the screen. Input determines the values of X and Y so we need to store the first two values in other variables, A and B, so that we can get the second set of coordinates into X and Y.

Step 6
- Calculate and store the slope of the line.
- Now we need the two points at the left and right sides of the screen for the line statement. The x-coordinates of these points are Xmin and Xmax.
- We need to compute the y-coordinates.
- The equation of the line is y = M*(x - A)+B (point-slope form).

Step 7
Your Task…
- Substitute Xmin and Xmax (the names not the values!) into the equation for x and store the results in the two variables Q and R representing the y-coordinates.
- Use the Line( statement to draw a line between the left and right side of the screen.

Step 8
Extensions
- Add a loop in this program to allow you to draw many lines without having to re-run the program which erases the screen.
- This program fails when the line is vertical. Why? Incorporate an If… structure to handle this special case
Step 9
Programming Points to Pixels
Imagine this: you use the Pt-On( statement to draw a point (A,B) on the graph screen. You now would like to label the point with some text. Where do you draw the text?
Write two formulas (one for C and one for D) that convert WINDOW coordinates to pixel coordinates for the Text( statement.
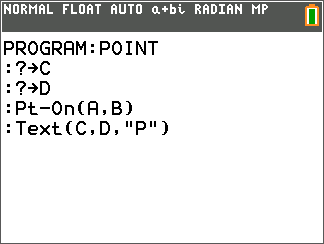
Step 10
This table (TI-84 Plus CE values) may help:
WINDOWS pixel
Xmin 0
Xmax 264
A ?
Ymax 0
Ymin 164
B ?
Note: remember that in the Text( command the first argument is the ROW number which corresponds to the y-coordinate or the point!.
Application Making a Point Bounce
Download Teacher/Student DocsIn this application for Unit 5 we’ll build graphics-based programs.
Objectives:
- Learn how to detect which device the program is running on.
- Making a point bounce around the screen.
Step 1
Program “Pong”
In the original video game ‘Pong’ a pixel bounced around on the screen. The players controlled ‘paddles’ as in ping-pong to keep the ball in play. This program will produce the ‘bouncing ball’. A point will move in an oblique line across the screen and when it hits a boundary it will change direction to look like it’s bouncing off the edge.
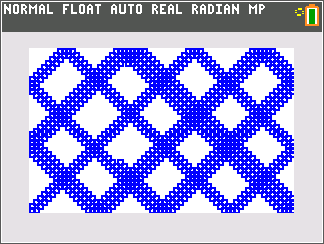
Step 2
The first problem to consider is the screen size, since the TI-84 Plus has a different screen size than the TI-84 Plus CE. The following code segment will detect the screen size:
:0➔Xmin
:1➔ΔX also on the VARS Window… menu
:If Xmax>95 then
<it’s a C or CE>
:Else
<it’s an 84 Plus>
:End
Step 3
At this point we now know the device and we set up variables in the Then and the Else blocks to use in the rest of the program: M for the width and N for the height.
For the C or CE: 264➔M and 65➔N
For the 84 Plus : 94➔M and 63➔N
Step 4
Initialize Variables
We also set up the y-range to be nice values, too:
0➔Ymin
1➔ ΔY
We’ll start the point (A,B) at a random location, but not too close to the edge of the screen:
randInt(10,M-10)➔A
randInt(10,N-10)➔B
We also set up two variables to represent the movement. These will be added to the point’s coordinates to move the point to a new position:
randInt(2,5)➔D change in A
randInt(2,5)➔E change in B
Step 5
Getting Started
We’re ready to start the action. We’ll use an infinite loop…
While 1
Pt-On(A,B,2) style 2 is a large square dot
<The rest of the program>
End
Tip: It’s a good idea to put the End in at the same time to keep track of them.
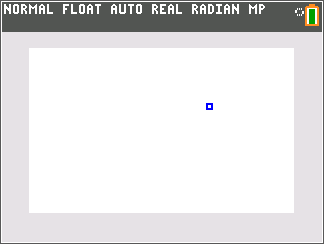
Step 6
Making it Move
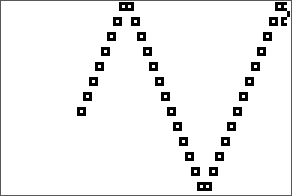
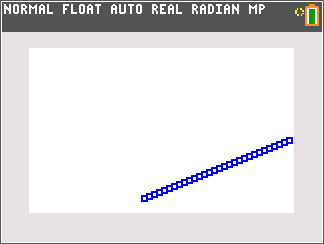
In the loop and after Pt-On( add the ‘change’ variables to the point’s coordinates:
A+D➔A
B+E➔B
This changes the point’s coordinates.
If you run the program now you will see the point go off in some direction and quickly go right off the screen as in the image to the right.
Step 7
Bouncing
To get the point to detect the edges of the screen we add If statements…
If A>M or A<0
Then
<this happens when the point is off the right or left side of the screen>
End
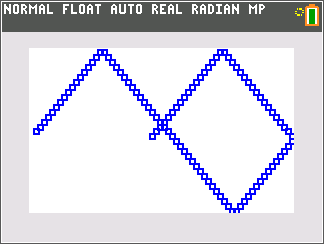
Step 8
Two things need to happen inside the Then:
+ Move the point back on the screen A-E➔A
+ Change the direction to the opposite direction -E➔E
Write a similar If statement to handle the y-coordinate B and it’s ‘change’ variable E.
Step 9
Extensions
Don’t leave a trail…
The Pt-Off statement will hide a point. Add a Pt-Off statement to your program so that the trail of points is not displayed, only the moving point. Caution: don’t turn off the same point you turned on. Turn off the previous point (you’ll need two more variables). The new code needs to go in the right place in the program.
Step 10
Lose the infinite loop…
getKey ([PRGM] I/O menu) will get a value representing a key without pausing the program like Prompt and Input. [ENTER] has the value 105 (row 10, column 5 on the keypad).
Here’s a skeleton of what needs to be done:
0➔K
While K≠105
<your program here>
getKey➔K
End
Your task is to decide where in the program these statements belong so that when you press [ENTER] the program ends.
Step 11
How About This…
When you press [CLEAR] (what getKey value is that?) the program starts over with a clear screen and new random values and when you press [ENTER] the program ends.
- Skill Builder 1
- Skill Builder 2
- Skill Builder 3
- Application
End of Course Projects
Extensions and More Practice
Download Student DocReady for more? Now that you have completed the course, you are ready to try your hand at some more challenges! Make sure you have completed all the Units prior to starting this section. The projects here will have you apply what you have already learned. Download the document here for challenges to choose from.
If you get stuck, refer back to the previous Units in the course. For an extra challenge, design your own program from scratch. If it’s really cool, post your work to social media and tag it @TICalculators. We would love to see your creativity! Good Luck and Get Coding!

